Removal and Study of the Cat Brain

Slide brain out of calvarium

Rear view of cat brain
Here are labeled images of other brains as well as the cat for study and cross reference:

mid sagittal cross section of the human brain

mid sagittal split sheep brain

ventral view of the cat brain
Our impression is that it is rare for college anatomy and physiology courses to remove the brain from their preserved study animals (usually cats). While it is a challenge, and takes considerable time, we have found that the process teaches not only the structures of the brain, but the protective function of the cranium, the relationship of the meninges, the branching of the cranial nerves into the floor of the cranium, etc. If your class uses the following protocol, we would be interested to hear, and welcome any suggestions you might have to improve it.
Supplies: Skinned preserved cat, injected
Tools: Spot lighting, hacksaw blade, fine pointed scalpel, wide bladed screw driver, flat jawed pliers

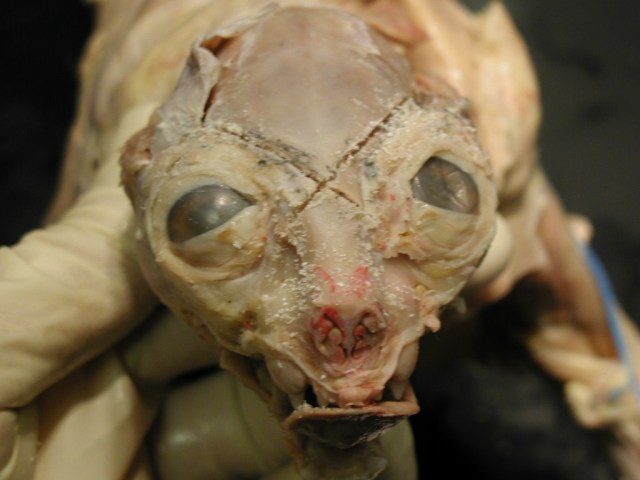
1. Clean the surface of the skull of a skinned cat of all muscle. (Give it a “muscle shave”!) Pay special attention to the temporalis and muscles at the rear of the skull. Clean the occipital bone well below the occipital protuberance. Here are class notes on preparation, cuts, and extraction of the cat brain.

2. Make the following seven cuts with a sharp hack saw blade. Take care not to saw too deeply or you will damage the brain.
a: FIRST, cut across the rear of the occipital bone, well below the occipital protuberance as low on the skull as muscle allows.

b: NEXT, extend the first cut through the widest portion of the cranium, on either side of the anterior portions of the occipital and parietal bones (cutting the R and L side) .
c: EXTEND the previous cuts (keep them shallow) laterally through the temporal bones. Keep the cuts at the widest part of the skull to ease removal of the brain.
d: LAST: Make the last two cuts, one each above the R and L superciliary ridges, so that the cuts form an X between the eyes. These cuts should meet the cuts through the temporal bone. Due to the large frontal sinuses, one must cut through two layers of frontal bone. Therefore, the cuts between the eyes must be much deeper than the other cuts.
3. Gently pry at the cuts using a wide-bladed screw driver, exploring where the cuts need to be made deeper. Start at the rear occipital cut and work forward. The frontal bone is difficult because of the large frontal sinuses. You must cut through both the exterior and interior layers of bone to free up the front of the unit. Do not push the screw driver too deep or you will damage the underlying brain. Repeat the sawing and testing with the screw driver until the calvarium becomes loose. Do not remove yet.
4. Remove the brain-calvarium unit: Lift the front of the calvarium, reach in and cut close to the bone cranial nerves and latex/vessels so that the unit lifts from the front. Lift as much as you can and cut the spinal cord as deeply as you can to leave it attached to the brain. Lift off the brain/calvarium as a unit.

5. Explore the edges of the cut bone around the brain. Often pieces of the frontal bone forming the orbital surfaces need to be flaked off, and overhanging pieces of bone around the cerebellum and the sides of the cerebrum prevent removal of the brain. Use flat nosed pliers to break away these pieces. You may need to saw off the anterior tip of the calvarium to remove the remaining frontal sinus pieces.
It is easier to remove the brain from the calvarium if the dura mater is snipped along the ventral surface. Press and pry the cerebrum out of the calvarium, leaving the dura mater attached to the calvarium. Because the tentorium cerebelli is ossified in the cat, you must pull the brain forward to avoid breaking brain apart at the midbrain.
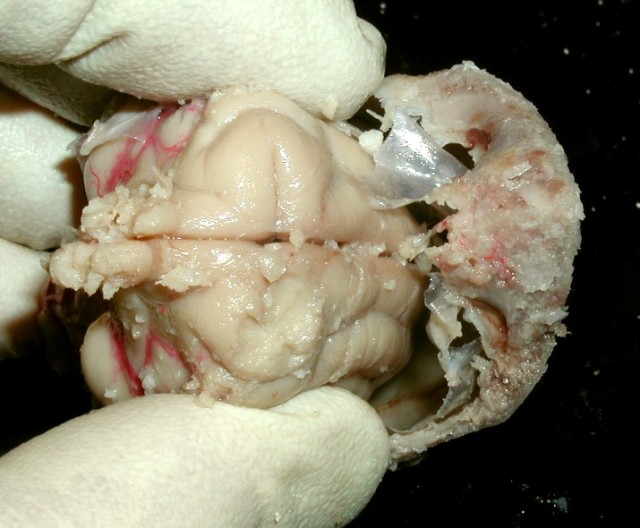
6. Take great care in lifting out the brain, so that as many features remain attached to the brain as possible, including the cranial nerves, and as much of the spinal cord as possible. The pituitary is usuallyretained in the sella turcica by a constriction of dura mater and becomes detached from the brain.

7. ILLUSTRATE THREE VIEWS OF THE ISOLATED BRAIN, label listed features:
a) ventral: cerebral hemispheres, the infundibulum, mammillary bodies, cerebral peduncles, pons, medulla oblongata
Here is a labeled version of the ventral brain.
Here is a version of the ventral brain with cranial nerves labeled
Here is a rough hand drawn illustration of the ventral brain.

b) posterior: R&L cerebral hemispheres, longitudinal fissure, R&L cerebellar hemispheres, vermis, dorsal medulla oblongata
Here is a labeled version of the posterior brain.
Here is a hand drawn illustration of the posterior and deep posterior on the same page.

c) posterior deep view by spreading R&L hemispheres: superior and inferior colliculi (= corpora quadrigemina), pineal gland, corpus callosum.
Here is a labeled version of the posterior deep brain.
NOTE: We will study the brain’s cranial nerves I, II, III, IV, V, VII and VIII next week.
Alternative means of removing calvarium (no longer used in 2001)
Remove the calvarium by sliding it backwards, leaving the brain in the skull. In the cat, the tentorium cerebelli is ossified, and is thus a challenge to remove the calvarium without damaging the connection between the cerebrum and the cerebellum. One strategy is to cut through the calvarium and attempt to slide the calvarium to the rear, between the cerebrum and cerebellum. Alternatively, two saw cuts may be made, one above and one below the tentorium, so that the calvarium is removed in two pieces.


