plaques have developed overnight as the phage lyse small areas of bacteria
Related protocols:
Preparation of Phage Stocks
Commonly Used Media for Phage Growth
Agar Overlay Technique
When an individual bacterial virus grows in a bacterial host suspended in a top agar lawn, its progeny infect and lyse the surrounding host cells. This causes the appearance of a “hole” or plaque in the otherwise homogeneous bacterial lawn. Since each plaque represents a single virus, the number of viruses in the aliquot added to the plate is equal to the number of plaques which appear.
Here is the experimental plan:
EQUIPMENT:
sterile capped 16×150 mm test tubes
sterile capped 13×100 mm tubes
sterile pipettes, 0.1 mL and 1.0 mL
hot block, 45°C
vortex
Bunsen Burner
37°C incubator melted top agar, about 60°C
SUPPLIES:
phage culture to be titered
sensitive host bacteria grown ON in TSB
(such as E. coli B)
sterile dH2O in 10.0 mL repipet
pre-warmed to 37°C tryptone soy agar plates
(or LB agar plates for lambda phage)
PROTOCOL:
THE PREVIOUS NIGHT:
grow bacteria with aeration for optimum virus production
1. Inoculate about 3-4 mL (for thirty plates) of nutrient broth or tryptone soy broth with a sensitive host (E.g.: E. coli B). Grow ON at 37°C in hot block. (Aeration is not mandatory.)
THE DAY OF ASSAY:
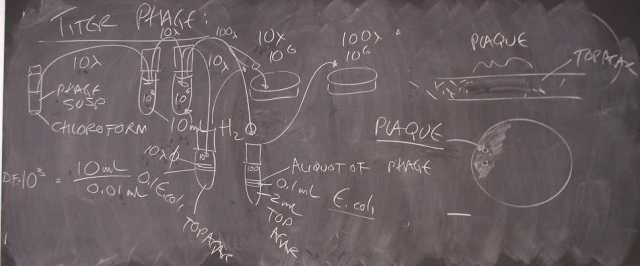
equipment needed to dilute phage stock
Equipment for dilutions: 10 uL phage stock into 10 mL
2. Prepare a dilution of the phage such that there are about 10^3 particles per mL (usually a dilution of 10^6: 10 uL into 10.0 mL, repeat a second time).
Add 0.1 mL down the side The bacteria are on top:
3. Set up seeded top agar:
a. Pipet about 2 mL of melted agar into sterile capped 13×100 mm tubes in 45°C hot block.
b. Pipet about 0.1 mL host bacteria (E. coli B) using a 1.0 mL pipet into melted agar (down the side of the tube is OK).
OLYMPUS DIGITAL CAMERA
4. Add phage: Pipet 10 uL or 100 uL of 10-6 phage into the host-inoculated tube (deliver with care, just below surface of agar).
5. Vortex to mix.
6. Pour out and distribute over a pre-warmed agar plate, immediately tilt back and forth to evenly distribute before it begins to gel. Let sit undisturbed until gelled.
7. When gelled (1-2 minutes), invert plates, incubate ON at 37°C.
THE NEXT DAY:
plaques have developed overnight as the phage lyse small areas of bacteria
8. Count all plaques, record data, calculate phage particles/mL in the original culture.
(Note that the plaques are round areas of clearing in the otherwise solid lawn of host bacteria (E. coli B in this instance
OLYMPUS DIGITAL CAMERA
Equipment for dilutions: 10 uL phage stock into 10 mL
grow bacteria with aeration for optimum virus production
Bacterial viruses have proven extremely valuable in the study of the mechanisms of DNA functioning. Their short life cycle (as short as 30 minutes) combined with their large number of progeny from each cell which is lysed (up to 400 phage particles/cell) allows the production of large numbers of progeny in a short amount of time. Their growth is also an excellent model for how mammalian viruses infect and reproduce.
EQUIPMENT: (See bacterial growth)
sterile capped 13 x 100 mm tubes
37°C hot block
micropipettor with sterile tips
sterile bubbler assemblies
aerator with humidifier flask
manifold with spaghetti tubing
spectrophotometer
clinical tabletop centrifuge
SUPPLIES
sensitive host bacteria (E. coli B)
phage inoculant (108/mL)
sterile screw capped tubes
chloroform
tryptone soy broth*
tryptone soy agar plates*
tryptone soy top agar (0.75% agar)
sterile dH2O in 10 mL repipetter
* Use LB medium for lambda phage
PROCEDURE:
PREVIOUS NIGHT:
1. START INITIAL HOST CULTURE:
The previous day, inoculate a small volume (about 1-2 mL) of nutrient broth or tryptone soy broth with a sensitive host (E. coli B for T4 phage). Grow overnight (ON) at 37°C in hot block without aeration.
NEXT MORNING:
2. PREPARE LOG-PHASE HOST CULTURE:
The next AM, using the same set up as you did for the bacterial growth curve, prepare a mid log phase culture of E. coli B by adding 0.1 mL of the ON culture to about 4 mL of tryptone soy broth, and aerate at 37°C in hot block. Aerate until it is barely turbid (A660 = about 0.100), about 1 – 1½ hours.
(NOTE: Read & graph A660 every 20 minutes during steps 2 & 3.)
log phase host ready for inoculation
2b. The mid-log culture should be barely turbid compared to uninoculated tryptone soy broth.
3. INOCULATE WITH PHAGE: Add 0.05 mL of 108/mL desired strain of phage to the mid-log culture. Aerate at 37°C until solution clears, about 1 – 2 hours. Continue reading & graphing the A660 every 20 minutes during step.(Try ON, it might work?)
4. PURIFY PHAGE PROGENY: The culture should lyse in a bout 1 to 1 1/2 hours after inoculation. Evidende of this will the a dramatic drop in the A660 in the culture.
Spin down the bacteria in the original culture tube for 10 min in a balanced clinical tabletop centrifuge at setting 5.
Decant the supernatant into screw-capped culture tube, add a few drops chloroform (~0.3 mL), shake, label with name of mutant phage, your initials and the date. Store at 4°C in the refrigerator.
5. TITER THE PHAGE CULTURE: To titer, dilute 106, plate out 0.1 and 0.01 on tryptone agar using E. coli B as indicator bacteria, incubate ON at 37°C. Count plaques and calculate total phage/mL in the suspension. (For details, see protocol Titering of Phage Viruses.)
OPENING THE ABDOMEN: Pinch the ventral abdominal wall to produce a transverse fold. Snip with heavy scissors along the linea alba so that you nick the wall longitudinally. (Alternatively, use the cut made during latex injection.) Carefully insert the blunt end of the scissors into the nick and lift thesuperficial layer of abdominal muscles away from the underlying organs. Snip down to the pubis. Extend the cut up to the sternum, again taking care not to damage the underlying organs. Make two transverse cuts in the abdominal wall on each side 1) just inferior to the ribs, and 2) at the pubis (don’t cut vas deferens). Reflect the two abdominal flaps exposing the underlying organs.
OPENING THE THORAX: Slip the blunt end of the heavy scissors under the xiphoid process, lift and cut through the sternum all the way to the jugular notch. Keep the angle of the blunt tip shallow to avoid underlying organs. Insert the finger into the thorax just above the diaphragm, feel for the point of attachment just inferior to the ribs. Make lateral cuts to free it from the lower rib cage. Spread the thoracic walls. You need to crack some ribs at the vertebral column to get a good view. Note the mediastinum (the space between the lungs) contains the heart, its pericardium, the great vessels, the trachea and the thymus. Preserve connections of the vessels of the thorax for the cardiovascular lab studied next quarter.
NECK: Extend the cut up to the chin. Neck muscles adhere tightly to underlying organs. Cut and reflect the superficial muscles to expose the larynx. Along the sides, push (with some force) the outer wall of the neck to separate the superficial from the deep neck muscles (probe deeply) but do not sever the nerves. Cut the muscles just below the mandible so that you can turn out the flaps.
I. NERVES OF THE NECK AND THORAX AND THE CERVICAL PLEXUS
vagus: Find the common carotid arteries on either side of the trachea. (Here we have lifted both the R and L common carotids). The vagus nerves are attached to the carotid arteries. (See Gilbert, p 62 & 65)
cervical nerves: Find the longus capitis muscle deep behind the common carotid. It is just lateral to the cervical vertebral column. Emerging from under the longus capitis, you should see several cervical nerves emerging laterally.They form the delicate cervical plexus. (Gilbert, p. 67 & 95)
Here is a labeled view of the nerves ant features of the neck.
Right
Left
phrenic: There are R & L phrenic nerves, easily seen at diaphragm, attached to vena cava on R, in pleural folds on L. (p 69) They emerge from the fifth and sixth cervical nerves.
The right phrenic is attached to the inferior vena cava (upper image)
The left phrenic nerve is enfolded in the pleural folds which are attached to the diaphragm
chain ganglia: Gently push thoracic contents to R side so that you can see the descending aorta along the center of the rear abdominal wall. Note the intercostal arteries which branch off it. The thin sympathetic chain ganglia lie on top of the intercostal arteries but under the parietal pleura on either side of the vertebral column. (Gilbert, p. 69)
Here is a labeled version of the thoracic cavity with chain ganglia.
II. NERVES OF THE ARM AND THE BRACHIAL PLEXUS (Gilbert, p. 62 & 95)
If not already dissected, cut and reflect the pectoralis major, pectoralis minor, the epitrochlearis and the deltoid complex. (Do not cut underlying features.)
brachial plexus:Lies outside the rib cage below where the subclavian vein branches into the axillary and subscapular veins. (Pectoral muscles must be cut and reflected to see the brachial plexus) The brachial plexus produces the following major nerves of the arm (p. 95):
If the epitrochlearis is not already cut and reflected, do so now to see the following nerves of the arm:
radial: This is the largest nerve emerging from brachial plexus, soon plunges below biceps brachii about half way down the arm.
Here is a labeled image showing radial, ulnar and median nerves.
ulnar: This is the medial-most of the three nerves, plunges below the surface near the olecranon. You know of this nerve because when you hit it on your elbow, you call it your “funny bone.”
median: This is the smallest of the three nerves, lies between ulnar and radial nerves, follows the brachial artery into the forearm.
III. NERVES OF THE LEG AND THE SACRAL PLEXUS (Gilbert, p.98 & 99)
If not already dissected, cut and reflect the biceps femoris to reveal:
sciatic nerve branches to form the tibial and peroneal nerves
sciatic: The largest nerve in the body, it descends the latero-posterior thigh under the biceps femoris, branches to form several nerves of the leg. Note the muscular branch of the sciatic coming off at the L of the view.
Here is a labeled view of the sciatic nerve, sacral plexus, tibial and peroneal nerves.
Tibial: The larger of the branches of the sciatic, plunges between the heads of the gastrocnemius, supplies lower leg.
peroneal: The smaller branch of the sciatic, branches laterally to supply the “side of the shin.”
sacral plexus: Follow the sciatic nerve upward with a probe. Lift the muscles above it and cut the muscles which overlie it (the gluteal muscles and the piriformis). Note several component nerves. (p. 99)
The second illustration is labeled.
CLOSING UP: As always, when you have finished for the day, replace the internal organs in their proper locations, close the cat, wrap in its skin, place in the plastic bag, press out the air, seal with three turns of a large rubber band and return to the box with number to right. Wash your desk top with warm soapy water. Wash your instruments well, dry them, replace the kit in the storage box. Check the sinks and the floor around your desk to be sure they are thoroughly clean.
NERVE ENDINGS ON THE PERIPHERAL NERVOUS SYSTEM
Of the nerve endings in the perpheral nervous system, the most highly developed are those which detect pressure and vibration in an organ, the Pacinian corpuscles. We will be looking a sections of pancreas which display these features.
Slide 10: Vater-Pacini corpuscles, pancreas, H-eosin (H 1688)
Pacinian Corpuscles (MF 9 th: page 229 and 147) at 100x:
Pacinian corpuscle:
connective tissue capsule
central cavity with numerous lamellae (with flattened nuclei)
naked dendrite
pancreatic acini
Here is a labeled view of Pacinian corpuscles.


