Single Colony Isolation

Single Colony Isolation

Robert Koch, in spelling out the criteria for demonstrating the etiologic agent for a disease, emphasized as two of his crucial criteria that one must isolate the putative agent in pure culture, and then experimentally cause the disease in a healthy animal with this pure culture.

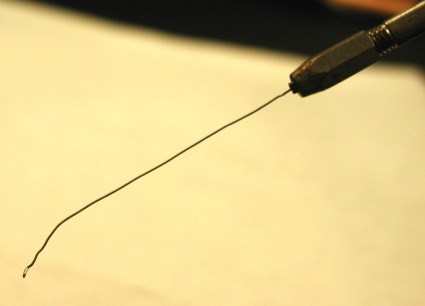
The technique which he developed to produce a pure culture, the idea for which came from his observation of colonies growing on the spoiling half of a baked potato, is termed single colony isolation. A colony is picked with a sterile loop, streaked out on a sterile plate. The loop is resterilized, and the initial streak is spread out across the plate in successive cycles of sterilization and cross streaking. The goal is to sufficiently spread out the inoculum so that individual colonies are formed. For rigorous applications, this process should be performed twice in succession. Practice the fluid movements of streaking (6, 7 & 8) with a pencil on paper to perfect the proper motion.

Make a careful full-sized plate illustration in your lab book practicing the primary, secondary and tertiary streaks as shown by the instructor. Always flame and cool the loop between each streaking. Make detailed notes in your book regarding the origin of the mixed culture, and the lineage of the colonies selected.

01_Nine_Mile_STP_0.01mL_EMB_P8011340

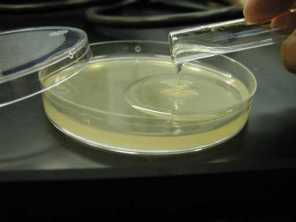
PREPARE SOURCE PLATE: Spread a suitably diluted mixed culture on a plate to give 100 to 500 colonies per plate, incubate until well-formed colonies appear (24-48 hours). [For example, from coliform plate count on EMB lac plates] This is your source plate.

02_Note_different_mprphs_Ecoli_green_sheen_P8011313

SCORE SOURCE COLONIES: Examine the source plate under a magnifying glass. How many classes can you identify? Pick colonies to be isolated: one lactose fermenting colony, and three other highly distinct non-lactose-fermenting colonies.

OLYMPUS DIGITAL CAMERA

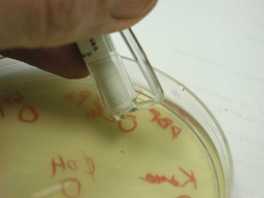
Select, circle and number them with a wax pencil: four colonies as distinctly different from each other as possible, the first of which is lactose positive, the latter three unambiguously lactose non-fermenting.

04_Table_Single_Colony_Isolates

Prepare a table to record the traits of these four selected colonies, as shown. in your notebook: size, morphology, color, wrinkled, mucoid, spreading, clear, etc. 

OLYMPUS DIGITAL CAMERA

PREPARE THE STREAK PLATE: Mark a fresh agar plate of the same type as in step 1 with a wax pencil to divide it in fourths. In small print, enter your initials, seat number and the date at one edge and label the four areas with the coded numbers of the selected colonies. 

06_prepare_loop_Bact_Pt_loop_P8011316

PREPARE THE LOOP FOR OPTIMUM PERFORMANCE: After flaming to ensure sterility, straighten out the shaft of the loop, ensure a smooth loop at the end, and fashion an angle towards the end to make picking a colony more precise.

07_Flame_loop_P8011324
Flaming the Loop

STERILIZE ADJUST LOOP : Flame a bacteriological loop so that the entire wire glows. When cool, adjust the 26 gauge platinum wire to the proper shape: 4 cm straight shank, the last 6 mm bent at a slight angle, tipped with a 1-2 mm loop, at a right angle to axis of handle.

08_Pick_selected_colony_EMB_P8011318

PICK THE COLONY: Reflame the loop. Open the source plate, touch the hot loop to a sterile part of the agar to insure that it is cool. Lightly touch the edge of the first selected colony so that you pick up a small sample. (If you pick up too much, it will not streak out properly. If you pick up too little, the transfer may not successful.) Close the source plate.

09_make_Primary_Streak_P8011320

APPLY PRIMARY STREAK: On the new plate, with reflected light showing your tracks, apply the primary streak by lightly zig-zagging the inoculating loop across the agar at one side of the semicircle with a small wiggling/dragging motion. Do not press hard enough to dig into the agar, nor to bend the loop.

10_Secondary_Streak_P8011321

PERFORM SECONDARY STREAK: Reflame and cool the loop as before. With a light sweeping motion (wrist stiff, pivot from elbow, little finger resting on table surface), perform the secondary streak: start at the terminal end of the primary streak, and sweep across the top of the semicircle, cross streaking several times back and forth through the primary streak.

11_Tertiary_Streak_P8011323

MAKE TERTIARY STREAK: Reflame and cool the loop as before. Rotate the plate 90 degrees, and cross streak through the secondary streak, starting at the far end, working towards the primary streak, and filling the rest of the semicircle. Do not go through the primary streak.

12_Finished_Plate_P8011334

For the remaining colonies to be purified, repeat the streaking procedure (steps 5 through 8). Here is the finished plate with four specimens streaked out, prior to incubation.

15_incubated_single_colony_plate_P8060019
Single colonies after incubation

Incubate for 24-48 hours at 37 C or until colonies are well formed. (Do not “overgrow.”) Score your streaking abilities: do you see numerous individual colonies well separated? Great! Note that the primary streak is confluent. Score the morphologies of the two isolated strains. Are they identical with the original colonies from step 2? Record your results.

OLYMPUS DIGITAL CAMERA

Here is an EMB plate streaked with a mixed culture of E. coli and Salmonella typhimurium (the streaks on the left and on the right). Perfect single colony isolation produces individual purple (E. coli) and pink (S. typhimurium) colonies. The streak at the top is pure E. coli. The streak at the bottom did not grow…

GRADING OF STREAKING ABILITY:
Prepare mixed culture of E coli and S typhimurium. Use also as sources of bacteria TSI slants with these bacteria on their surfaces (or colonies of each). Have student mark plate into fourths, with Ec and St across from each other, the mixed culture streaked in two quadrants across from each other as well. Tell them to mark the plates with the usual information (initials, date, seat, and the quadrants marked, and to enter the data in their notebooks.

Grade the plates as follows:

Proper technique:
initials
date
seat

streaks:
not touching or cross contaminated

single colonies in each streak get 2 points, including both St and Ec in the mixed culture streaks.

Total score: 15 points (3 for technique, 2 for Ec, 2 for St, 2+2 for each of the two mixed cultures.

Assay for Coliform Contamination in Ambient Water

Assay for Coliform Contamination in Ambient Water

Man has long recognized the dangers of drinking water which is contaminated with fecal waste. Major diseases which are spread in this manner include cholera, salmonellosis, dysentery, shigellosis, polio and many others. Mammalian fecal wastes carry large numbers of gram negative rod-shaped bacteria which are capable of using lactose (milk sugar) as a carbon source. Bacteria with these properties are collectively termed coliform bacteria. The presence of coliform bacteria is widely used as an indicator of potential fecal contamination. Escherichia coli is the most famous member of the coliform group.

Ecoli_green_sheen_P8011313
E. coli typically has a green sheen

A selective and differential medium which can be used to enumerate the number of coliform bacteria is Levine EMB Agar. It contains nutrients, 1% lactose, agar and two dyes, E osin and Methylene Blue. These dyes serve two purposes: first, as a selective medium, they inhibit the growth of gram positive bacteria, and second, as a differential medium, they cause colonies which ferment the lactose (“lac+”) to turn purple (E. coli typically has a green sheen ) while the “lac” colonies will be pink or uncolored.

Ohio_River_0.2mL_MaC_P8011311
lac + appear red, while lac – appear white

A second medium which may be used to enumerate coliform is MacConkey’s Agar which contains 1% Lactose, 0.15% Bile Salts, and the dyes Neutral Red and Crystal Violet. These dyes act much the same as the dyes in EMB agar, but lac + appear red, while lac – appear white .

By spreading a known quantity of aqueous sample (often 0.1 mL) on one of these media and incubating until colonies have formed, the number coliform will be equal to the number of lac + colonies, and indicates the degree of potential fecal contamination. A sub set of coliform, termed fecal coliform, are defined as those coliform which grow at the elevated temperature of 44.5 C instead of the usual 35 C.

RELATED PROTOCOLS:
Commonly Used Media
Sterile Delivery of Liquids by Pipet
Plate Spreading Technique

EQUIPMENT LIST:
sterile screw-capped culture tubes
Levine-EMB and/or MacConkey Agar plates
sterile pipets, 0.1, 0.2 and/or 1.0 mL
spreader, turntable
flame
35C incubator

1. COLLECT SAMPLE: Collect sample as close to plating time as possible, or keep refrigerated until plating. Use sterile screw-capped culture tubes (10 or 20 mL), fill 2/3 full from midstream of a flowing stream . Do not contaminate with sediment from stream bottom. Cap immediately . Write in pencil on the tube’s frosted area: location of collection point, date and your initials. Samples from above and below sewage treatment plant outfalls can be interesting, demonstrating whether raw or improperly treated sewage is contaminating the river.
2. PLATE OUT ON THE DIFFERENTIAL AGARS: Label plate with seat number, initials, source and aliquot volume. Using sterile technique as outlined in Plate Spreading Technique , spread 0.1 mL of sample on EMB and/or MacConkey agar. Plate 0.2 mL if the sample is thought to be unpolluted. If you believe the sample to be highly polluted, pipet 0.1 mL of sterile dH2O on the plate, then deliver 0.05, 0.01 or even 0.005 mL to the plate and spread. Incubate at 35o C for 48 hrs.
3. SCORE THE PLATES: Count and record the total colonies and also the number of coliform colonies/plate. Those which are lactose fermenting are purple. Calculate the number of these categories/100 ml of sample, enter into your notebook.
4. ENTER INTO THE CLASS DATA SHEET. Enter your data in the spreadsheet on the computer. After class data have been collected, mount the table in your note book.
RESULTS:
We have found some interesting (and disturbing) concentrations of bacteria, and coliform in particular in samples over the past few years.

ICE TEA:

We demonstrated in 1994 that restaurant ice tea often contained extremely high numbers of coliform. Here are some plates of restaurant ice tea (0.1 mL each) one from July 2001 , and another from July 2000 . These contain so many bacteria that they could not be accurately counted, but we estimate that they contain between 500,000 and 1 million bacteria per 100 mL, most of which are coliform. The standard for drinking water is 5 coliform per 100 mL, and for recreational waters, 5,000/100 mL. It would be illegal to swim in these samples of ice tea.

STREAMS AND RIVERS:

Here is a picture of an EMB lactose plate on which was plated out only 0.05 mL of “treated” sewage from the Nine Mile Sewage Treatment plant outfall . Here is a MaConkey Agar plate containing 0.2 mL of Ohio River water taken on the same day. Notice that the bacterial count is MUCH lower than that of ice tea…

Hemolytic Streptoccus Detection

Hemolytic Streptoccus Detection by throat Culture

The Streptococci cause more disease than any other single group of bacteria. They are aerotolerant, but do not use O2 and lack catalase. Most streptococci are non-pathogenic, including lactic acid fermenters found in fermented milk products such as yogurt, buttermilk and sour cream.

S_pyogenes_MB_P8020065crp

(The image is of Streptococcus pyogenes at 1000x, stained with methylene blue.)

Pathogenic strains of strep are characterized by two traits:

1. HEMOLYSIS: Pathogenic strains produce the exotoxin streptolysin which causes the complete lysis of red blood cells. When these strains are grown on blood agar, their colonies are surrounded by a yellowish halo of complete clearing on a background of the bright red agar, called beta hemolysis. Some strains produce partial hemolysis on blood agar, and produce turbid halos with a greenish cast around the colonies, termed alpha hemolysis. Those strains which produce no lysis are termed (for some reason) gamma hemolytic. Here is a labeled image displaying both alpha and beta hemolysis.

2. ANTIGENICITY: The M protein is part of the cell wall, and functions to mediate attachment and to resist phagocytosis. These M proteins have been serologically classified by Rebecca Lancefield into groups A through O. Pathogenic strains of strep are limited to those which carry the group A antigen.
Thus, pathogenic strep is Group A, beta hemolytic. Streptococcus pyogenes is most common member of this group. It causes a wide variety of diseases including:
Strep throat: beefy red pharynx, fever, sore throat (80% Strep infections are asymptomatic)
Puerperal fever: infection of the uterus following contamination during childbirth.
Rheumatic fever occurs in 3% of untreated strep-infected children with febrile exudative pharyngitis, and is thought to be an autoimmune manifestation. One to five weeks following a strep infection the sequelae may include rheumatoid arthritis, endocarditis, and/or pyelonephritis.
We will learn to perform a diagnostic test for beta hemolysis on blood agar in which a plate is inoculated with a throat swab (of the oropharynx and palatine tonsils) and incubated at 35C. Presence of nunerous colonies with the beta hemolytic reaction on the plate strongly suggests strep throat.

oropharynx_P2253089sm

Illustrate the structure of the oropharynx, including palatine tonsils, soft palate, oropharynx and the uvula. Review the subject in an anatomy text. Click on the image to see a labeled view of the oral cavity.

EQUIPMENT AND SUPPLIES:
well-focused light to illuminate oropharynx
Tongue depressors, sterile
Sterile swabs, 15 cm long
Blood Agar Plates
fresh culture of Streptococcus pyogenes
Incubator, 35C

1. SETUP: For right handed persons: Position subject around the corner at the right end of desk, with the light to your left so light will project on rear of throat .
2. Have subject comfortably open mouth, relax tongue, insert depressor all the way to the rear of tongue and depress entire tongue to hold out of way .
3. TAKE SPECIMEN: Have subject say “Aaaah” and GENTLY swab across the rear of the oropharynx and tonsils (suspended on either side of the oropharynx) if present.
4. APPLY TO BLOOD AGAR PLATE: Swab the specimen across one half of the surface of a Blood Agar Plate, rolling the swab as you sweep it across, then stab almost to the bottom of the agar several times at the origin of the streak. Swab a known culture of Streptococcus pyogenes on the other half of the plate as a positive control.
5. INCUBATE: Place the plate agar side up at 35C for 24 hrs.
6. SCORE THE PLATE: Examine the plate for hemolysis, record results. Handle with careful attention to aseptic technique, since known pathogens are growing on the plates.

Here are a few pictures of hemolytric reactions:

OLYMPUS DIGITAL CAMERA

Blood agar plate with Streptococcus pyogenes streaked at the top and a throat swab on the bottom. Note the clarity of the clearing around the S. pyogenes colonies, and the characteristic greenish turbidity of alpha hemolysis in the throat swab.

hemolysis_P7271262
beta hemolysis

A mixed streak of non-hemolytic (larger colonies) and smaller Streptococcus pyogenes colonies showing zones of clearing around each colony.

hemolysis_P7271261

Mixed streak showing the clearing around a concentration of S. pyogenes colonies.

hemolysis_P7271264
alpha hemolysis

Close up of a student’s throat swab with alpha hemolysis surrounding the streak.

throat_culture_P2273129md

Here is a student’s culture showing considerable beta hemolysis. Streptococcus pyogenes is streaked at the top as a positive control.

Bacteria Growth Inhibition

Bacteria Growth Inhibition
Comparing Antibacterial Potency

See the related protocol on Agar Overlay Technique

EQUIPMENT AND SUPPLIES:
Fresh overnight cultures of Escherichia coli B and Staphylococcus aureus
2 prewarmed nutrient agar plates (or tryptone soy agar) per student
melted top agar (Nutrient Broth + 0.75% agar)
sterile 13 x 100 mm capped test tubes
45°C hot block
micropipetters with sterile yellow tips
assorted putative anti-bacterials
sterile (thick) filter paper plugs, 1/4 inch in diameter

ANTIBIOTIC DISCS:
1 Chloramphenicol
2 Erythromycin
3 Kanamycin
4 Vancomycin
5 Neomycin
6 Novobiocin
7 Penicillin
8 Streptomycin
9 Tetracycline

PROTOCOL:

OLYMPUS DIGITAL CAMERA

Compile a list of the putative anti-bacterial agents which you wish to test for their ability to inhibit bacterial growth. Up to seven may be used on a plate if they are carefully applied and are not allowed to spread across the plate. The list of possible agents which you could test is very long.
Suggestions:
isopropyl alcohol
salt
Lysol
mouthwash
soap
iodine crystals
silver foil
copper foil
merthiolate
neosporin
garlic, fresh, crushed
garlic, fresh, cut with razor blade, not crushed
onion juice
saliva
hand sanitizer
EtOH solutions


Draw the plate in your book, life-sized and identical to original. List the agents in a table and describe how each is prepared and quantities applied to the plate. Leave an empty column to record the size of the zone of inhibition observed.

03_UV_plate_layout_P7250027

Mark the plate bottoms with seven well-spaced small (1/4 inch in diameter) circles:
one in center, six arranged hexagonally around it, at least 1/2 inch from the edge).
Label each circle with the agent to be tested.
Write your initials and the date in small letters at the upper edge of the plate bottom.

Seed_melted_agar_P7231207md
Prepare the inoculated agar overlay blanks: Add 0.1 mL of a fresh ON culture of E. coli B to 2 mL of 45°C melted top agar.
Use of an Eppendorf repipet simplifies the addition.
Repeat for Staphylococcus aureus blanks.

Agar_Overlay_pouring_P7260025

Diagram for making the agar overlay.

Poured_seeded_agar_P7231209md

Mix and pour over the surface of a pre-warmed nutrient agar plate.
Shake gently side to side to ensure that the entire surface of the plate is covered. Do not take too long or the top agar will begin to solidify.
Let sit undisturbed for several minutes to gel. (See protocol: Agar Overlay Technique.)

Place a filter paper plug at each spot where a liquid agent will be tested. (Solids need no filter paper).

08_Apply_antibiotic_disc_P7231212

Apply the putative anti-bacterials: Add 10 to 15 uL of each liquid diluted according the directions for use to the filter paper plugs. (Deliver slowly so not to overshoot.) If they are viscous, dilute them 10x so they can be pipetted. If solid, deliver to the agar surface a crystal about the size of a head of a pin for known poisonous agents, 10x that much for probable non-toxics. Carefully note in your notebook how they were prepared and/or the quantities applied. Let sit to allow liquids to absorb

08_Apply_antibiotic_disc_P7231212

Press the disc into the top agar to ensure exposure to the agent.

10_Ecoli_Saureus_HA.Aug06

Invert the plate, incubate at 37°C for 24 to 48 hours.

OLYMPUS DIGITAL CAMERA

Measure the zones of inhibitions around each agent in millimeters. Draw the zones of inhibition onto your notebook illustration of the plate, with circles corresponding to the zone of inhibition. Record the size of the inhibition zone in your table.

Gram Stain Protocol

Gram Stain Protocol

Hucker’s Modification

[modified from C.R.C. Manual of Clinical Lab. Proc., 2nd Ed., p.269 & 270 (1970).]

PRINCIPLE:

Both Gram-positive (Gm+) and Gram-negative (Gm) organisms form a complex of crystal violet and iodine within the bacterial cell during the Gram-staining procedure. Gm+ organisms are thought to resist decolorization by alcohol or acetone because cell wall permeability is markedly decreased when it is dehydrated by these solvents. Thus, the dye complex is entrapped within the cell, resist being washed out by the solvents, and Gm+ bacteria remain purple following this differential stain.

In contrast, cell wall permeability of Gm- organisms is increased by ethyl alcohol washing because it removes the outer membrane from the Gram-negative cell wall. This allows the removal of the crystal violet-iodine complex from within the cell. The decolorized Gm- cell can then be rendered visible with a suitable counterstain, in this case Safranin O, which stains them pink. Pink which adheres to the Gm+ bacteria is masked by the purple of the crystal violet.

DEMONSTRATION: Prepare and stain three smears on the same slide:

(Do not contaminate original cultures.)

position on slide:) specimen in the smear:                    reaction to Gram stain:
smear 1) thin smear of fresh yogurt only                                        Gm+
smear 2) thin smear of fresh yogurt and fresh E coli culture) both Gm + and Gm-
smear 3) thin smear of E coli culture only                                        Gm-

PROCEDURE:

01_prepare_smear_P7111100

Prepare thinlyspread smears of fresh bacteria, see Bacterial Smear and Staining Protocol.)
Note that older or low viability cultures may not stain with accurate Gram stain characteristics.

02_Huckers_stain_P7111107
Applying Hucker’s Stain

PRIMARY STAIN: Stain with Hucker’s Stain for 1 minute. (If over-staining results in improper decolorization of known Gram-negative organisms, use less crystal violet.)
Wash in tap water no longer than 2 seconds to remove liquid Hucker’s stain.


MORDANT: Flood the smear with Gram’s iodine. Allow to remain for 1 minute. (Note irridescence when the Gram’s Iodine is of sufficient strength.)

DECOLORIZE with 95% ethyl alcohol over a sink. Continue applying EtOH until the purple dye no longer flows from the smear. (Acetone may with caution be used as a decolorizing agent, since this solvent very rapidly decolorizes the smear.)

Wash in tap water for 2 seconds to remove the EtOH. (The following stain will not take if EtOH remains on the slide.)

09_Grams_SafraninO_P7111113
Counterstain with Safranin O

COUNTERSTAIN: Flood the smears with safranin 0. Allow to stain for 1 minute.

Wash with tap water.

Blot dry gently between sheets of bibulous paper or lint-free paper towel (do not rub…).

Here is a page of gram stained specimens, including buttermilk, sour cream, sour dough starter, yogurt, yogurt and E. coli, and bacteria in a tongue scraping.
Examine under 1000x oil immersion lens. Illustrate morphologies and staining patterns observed.

Here are three examples:
1)  yogurt alone (Lactobacillus and Streptococcus),
2)  E. coli alone,
3) Mixture of #1 and #2.

REAGENTS FOR THE GRAM STAIN:

1.Crystal violet (Hucker’s Stain
Solution A
crystal violet, certified 2.0 g
ethyl alcohol, 95% 20.0 mL

Solution B
ammonium oxalate 0.8 g
distilled water 80.0 mL

Mix solutions A and B. Store for 24 hours before use. The resulting stain is stable.

2. Gram’s iodine: Dissolve 0.33 g of iodine and 0.66 g of potassium iodide in 100 mL of distilled water Alternately, dilute 0.1 N iodine 1:4. (Gram’s Iodine solution should be fresh. If it has weakened and appears tan it will not work.)
3. Ethyl alcohol (95%)
4. Counterstain stock solution : Dissolve 2.5 g of certified safranin 0 in 100
5. Counterstain working solution:  Dilute stock solution 1:10 with dH2O.

Equipment for a Microbiology Workstation

Equipment for a Microbiology Workstation

The common manipulations involved in microbiology require a fairly standard set of equipment. You will be assigned a work station which you will share with two or three other students should include the following set-up. Ensure that it is kept clean, all apparatus is in good repair, and solutions in adequate supply. Report problems either to the instructor or the lab manager.

Establish your station adjacent to a sink, with gas supply nearby:

Equipment and suppliesComments and/or explanations

Kimwipes Lab tissue: smaller, purer and tougher than “Kleenex,”

wax pencil For writing on test tubes, and petri dishes (which must be clean and dry in order to write on them). Do not peel more paper off than to just expose the wax tip.

flint striker Make sure that the flint is not worn down, replace if it is.

Bunsen burner with hose To light: close needle valve, half close air holes, turn on gas supply, position ear near burner mouth, open needle valve until hissing is heard, move head away from burner, place striker directly at mouth of burner, sharply squeeze striker, pressing flint into file surface (you must be able to make bright sparks). Adjust size and intensity of flame to proper levels.

box microscope slides Should be clean–you will probably have to wash with soap and water to be sure. Clean, sterilize & drain dry after use.

box cover slips Discard after single use.

hand soap in petri dish Keep water from pooling in the dish

inoculating loop in chuck: Platinum wire, 26 gauge, 7 cm long. Make a 1-2 mm loop at end, (tweezers work for this) bend the last 6 mm bent at a slight angle.

Squirt Bottles in carrier containing:

tap water For flushing off excess stain into sink

distilled water Q.s. solutions to given volume, where dH2O is required

70% EtOH Most effective antiseptic concentration, for sterilizing field

95% EtOH Used for sterilization where rapid evaporation is required

Dropper Bottles in tray:

dH2O For suspending samples. Be sure the water is pure, no floaters)

0.3% Methylene Blue General basic stain

Hucker’s Stain Gram stain primary stain: Gentian violet with ammonium oxalate

Gram’s Iodine Gram stain mordant: make sure it is fresh. (It will weaken with age, looks pale tan, which will cause the Gram stain to fail)

Safranin O Gram Stain counterstain (Red)
Later in course, for spreading plates:

vortex mixer Set to go on when pressed. Grasp test tube firmly at its top, press bottom into rubber cup. The rotation of the cup will cause a vortex in the contents of the tube. Halt vortexing, and repeat these steps two more times to thoroughly mix.

turn table Spins an agar plate as a specimen is spread on its surface

EtOH in 250 mL beaker w/lid 95% EtOH is used to sterilize the spreader. Keep lid in place to slow evaporation.

spreader Prepared from a properly bent from glass rod, is used after sterilization in 95% EtOH and flaming off excess EtOH to spread specimens.

Dilutions: Principles and Applications

Dilutions: Principles and Applications

Dilutions: Principles and Applications

Because solutions in science are often much more concentrated than are desired or can be managed for a given protocol, it is frequently necessary to dilute these solutions to a desired level. This requires a working knowledge of the principles of diluting, dilution factors, concentration factors and the calculations involved. High dilutions are usually expressed exponentially (i.e: a solution which has been diluted a million fold is termed a 106 dilution, or is 10-6 concentration).
DEFINITIONS:

Aliquot: a measured sub-volume of original sample.

Diluent: material with which the sample is diluted

Dilution factor (DF): ratio of final volume/aliquot volume (final volume = aliquot + diluent)

Concentration factor (CF): ratio of aliquot volume divided by the final volume (inverse of the dilution factor)
To calculate a dilution factor:

Remember that the dilution factor is the final volume/aliquot volume.

EXAMPLE: What is the dilution factor if you add 0.1 mL aliquot of a specimen to 9.9 mL of diluent?

  1.  The final volume is equal the the aliquot volume plus the diluent volume:  0.1 mL + 9.9 mL = 10 mL
  2. The dilution factor is equal to the final volume divided by the aliquot volume: 10 mL/0.1 mL = 1:100 dilution (10 2)

The Concentration Factor for this problem = aliquot volume/final volume = 0.1/(0.1 + 9.9) = 0.01 or 10 -2 concentration
To prepare a desired volume of solution of a given dilution:

  1. Calculate the volume of the aliquot: it is equal either to
  • the final volume/dilution factor

or

  • the concentration factor x final volume
  1. Calculate the volume of the diluent: which is equal to (the final volume – aliquot volume)
  2. Measure out the correct volume of diluent, add the correct volume of aliquot to it, mix.

EXAMPLE:  How would you prepare 20 mL of a 1:50 dilution?

  1. Determine required aliquot by dividing final volume by dilution factor:  20 mL/50 = 0.4 mL sample
  2. Subtract the aliquot volume from the final volume:  20 mL – 0.4 mL = 19.6 mL diluent
  3. Measure out 19.4 mL diluent, add 0.4 mL sample to it, mix thoroughly

SAMPLE PROBLEMS: (Note that these are in a different order than originally given out in class)

  1. How much sample (what sized aliquot) is required to prepare 10 mL of a 1 to 10 dilution, and how much diluent would you need?
  2. What is the dilution factor when 0.2 mL is added to 3.8 mL diluent? What is the concentration factor?
  3. You are to prepare 5 mL of a 102 dilution.  What should the aliquot and diluent volumes be?
  4. How would you prepare 20 mL of a 1:400 dilution?
  5. What is the dilution factor when you add 2 mL sample to 8 mL diluent?
  6. You add a pint of STP gas treatment to a 12 gallon fuel tank, and fill it up with gas. What is the dilution factor? (8 pints/gallon)
  7. You want 1 liter of 0.1 M NaCl, and you have 4 M stock solution. How much of the 4 M solution and how much dH2O will you measure out for this dilution?

For problems like the following, you need to know the ratio of the diluent to the aliquot.  For instance, if you are making a 1:20 dilution, the ratio of diluent to aliquot will be1 less than the dilution factor, or 19 parts diluent, 1 part aliquot:

  1. You have 0.6 mL of sample, and want to dilute it all to a fiftieth of its present concentration. How much diluent will you add, and what will the final volume be?
  2. You diluted a bacterial culture 106, plated out 0.2 mL and got 45 colonies on the plate. How many bacteria/mL were in the original undiluted culture?

A harder one which requires a little algebra:

  1. You have 100.00 mL of dH2O. How much glycerine would you have to add in order to make a 2.000 % v/v dilution?
    (Hint, let the volume of glycerine = X, set up the standard equation for a dilution factor using X, and solve for X.

ANSWERS:

1)  1 mL sample + 9.0 mL diluent

2)  DF = 20, CF = 0.05

3) aliquot = 0.05 mL, diluent = 4.95 mL

4) 0.05 mL sample, 19.95 mL diluent

5)  DF = 5

6) F.V. = 12 gallons x 8 pints/gallon = 96 pints.  Therefore 96pints/1 pint = D.F. =96

7) 25 mL 4.0 M stock solution + 975 mL dH2O

8) 29.4 mL diluent, final volume = 30 mL

9) 2.25 x 10^8

10)  ans: 2.04 mL glycerine  [ To solve:  a)  X/(100+X) = 0.02;   b)  X = 0.02 (100 +X);   c)  X = 2 + 0.02X ;  d)  X – 0.02X =2;  e)  0.98X =2;   f)  X = 2.04 ]