
Bacterial Morphology


There are three basic morphologies of bacteria (based on the shape ofa single cell): bacillus (little rod), coccus (grain or berry) or spirillum(coiled or helical). Slide 2 in your slide collection (Bacteria, threetypes, 90 W 0151) contains stained examples of these three morphologiesof bacteria. The following images were taken at 1000x using the oil immersion lens:
Examine this slide, following the same sequence of steps used in viewing the letter “e”:

Focus on the center specimen with the 4x objective. It is the one stained purple, and may look like a mass of tangled dark threads. Examine the samespecimen next under the 10x lens, locating an area which is not too denselypacked with cells. Then view with the 40x lens. What is its morphology? Do you see occasional transparent areas within the bacteria? These are spores . Illustrate this view large enough to fill 1/3rd of thepage. Make the cells about 3 mm wide (1/8th inch), and make the length proportional to their width. Label the illustration according to morphology,color and power of magnification (400x). Include several spores.
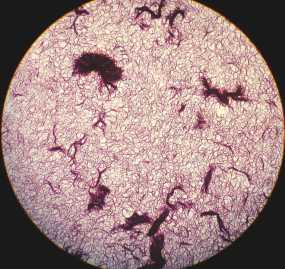
Examine the same specimen next under the 10x lens, locating an area which is not too densely packed with cells. The view is magnified 100x.

Then view with the 40x lens. What is its morphology? Do you see occasional transparent areas within the bacteria? These are spores . Illustrate this view large enough to fill 1/3rd of the page. Make the cells about 3 mm wide (1/8th inch), and make the length proportional to their width. Label the illustration according to morphology, color and power of magnification (400x). Include several spores.

Here is the same specimen at 1000x, using oil immersion, which you will soon learn to use.

Without changing the focus or objective, move the slide laterally to view the right hand specimen. (Remember that, under the microscope, the image appears to move in the opposite direction.) Illustrate and label as in step 1. Note the arrangement of the cells. Try to keep the same scale which you used for the first illustration


The preceding images are the specimen at 40x, 100x and 1000x

Move the slide the opposite direction (to the left), past the center specimen, carefully adjust for optimum lighting (this is the most difficult specimen to observe) and repeat the illustration process for the remaining specimen.
