Vitamin C Assay Introduction and Reagents

Vitamin C Assay Introduction and Reagents

titrated_sample_P5020018sm
the end point is the appearance of the blue starch-iodide color

Vitamin C (ascorbic acid) is required for the synthesis of collagen and to enable WBC phagocytosis, among others. It also serves as an antioxidant, protecting the body from oxidant carcinogens. It is found especially in fresh fruits and vegetables, but is labile, and deteriorates with storage. We will measure vitamin C first in pure solution (to standardize the assay reagents), then in fruit juice. Finally, as a means of evaluating the amount of vitamin C you are taking in, we will measure the quantity you excrete in one hour in your urine.

We will assay vitamin C by using a “starch-iodine” titration. When iodine is added to a starch solution, it reacts to produce a purple color. However, if there is any vitamin C in the solution, it “neutralizes” the iodine, preventing the formation of the purple color. Thus, the amount of vitamin C present in a solution may be measured by first adding a small amount of acidified starch (called “reaction mix”), and then adding iodine drop wise until the solution turns purple. The amount of vitamin C present will be proportional to the amount of iodine required to turn the solution purple. This drop wise addition of a reagent to a specified endpoint is called a titration.

The solutions required to perform the assay for vitamin C are listed below. While they will be available for you in the lab, you should know the function of each of the ingredients in the titration, and how to make up the solutions if needed.
Here are the reagents needed for the titration:

1)  Reaction Mix:  a dilute solution of starch which is slightly acidified to stabilize the color.
2)  0.1 N Iodine : the stock solution of iodine which must be diluted before using for titrations.
3)  0.01 N Iodine :  titrant for the vitamin C titration
4)  1.000% vitamin C :  a standard solution used to determine the conversion factor of the 0.01 N Iodine.
1)  REACTION MIX, for 1 gallon:

1. Weigh out  1.2 g starch powder
2. Suspend starch powder in  200 mL dH 2O. Bring to boil with constant stirring, taking care not to burn.
3. Fill a clean 1 gallon jug half full with  dH2 O.
4. Add the following to the half filled gallon jug:
a. 47 mL concentrated HCl
(CAUTION, extremely corrosive, use goggles, lab coat and fume hood, rinse out graduated cylinder immediately.)
b. 200 mL starch solution from step 2.
c. q.s. to 1 gallon with  dH2 0, mix thoroughly.
5. Use 10-15 mL of reaction mix (Rxn mix) per titration flask, conveniently added with a repipet.
[for 5 gallons of reaction mix: 6 g starch, 235 mL concentrated HCl]

2)  0.1 N IODINE stock solution

1. Weigh out and dissolve in 100 mL dH 2O with much stirring:
12.7 g Iodine
20.0 g KI (potassium iodide)
2.  q.s. to 1 liter with  dH2 0, keep well capped with iodine-resistant plastic-lined lid.

3)  0.01 N IODINE solution (for titrations)
1.  378 mL 0.1 N Iodine added to gallon jug
2.  q.s. to 1 gallon with  dH2 0, mix thoroughly, keep well capped.

4)  1.000% ASCORBIC ACID standard solution:

1. Carefully weigh out  1.000 g ascorbic acid, add to 100 mL volumetric flask
2. Add approximately 50 mL room temperature  dH 2 0, swirl to dissolve.
3.  q.s. to 100.00 mL with room temperature  dH2 0
4. Store capped at 4C.

Endonuclease Digestion of DNA

Endonuclease Digestion of DNA

Endonucleases are the highly specific enzymes which recognize unique palindromic sequences in DNA at which they hydrolyze the phosphoester linkage. These enzymes have been crucial in the burgeoning fields of genetic sequencing and engineering. Because endonucleases are commonly found on the surface of the skin, as well in bacteria, latex gloves are routinely worn and good sterile technique is required when performing DNA manipulations.

We will perform three digestions on purified lambda phage DNA:
1) with Hind III (A|AGCTT), isolated from Hemophilus influenzae,
2) with Eco RI (G|AATTC), isolated from Escherichia coli, and
3) with both. [BamHI (G|GATCC) may also be used]

The resulting fragments can be used to construct a restriction map of the lambda genome.

EQUIPMENT:
All equipment and supplies listed in the protocol on Electrophoresis of DNA Fragments
37C incubator
Microcentrifuge tubes

SUPPLIES
Lambda DNA 0.5 ug/µL [50 ug]
(We have found it convenient to purchase lyophyllized
lambda DNA and rehydrate it when needed.
Eco RI endonuclease, 10 units/µL [2000 units]
Hind III endonuclease, 10 units/µL [2000 units]
specific buffers for Hind III and Eco RI
Hind III lambda digest, 0.125 ug/µL
loading dye

1. Prepare the digestion tubes in an Eppendorf microcentrifuge tube:

Single digestion:

0.0 µL ddH2O (enough to q.s. to 30 µL, depending on DNA conc.)
3.0 µL 10x buffer for the endonuclease you are using
17.0 µL Lambda DNA (at 0.286 ug/µL, = 5 ug DNA)
10.0 µL Eco RI or Hind III (10 units/µL = 100 units total enzyme)
total volume: 30.0 µL
Set up the double digestion:

0.0 µL ddH2O (enough to q.s. to 30 µL, depending on DNA conc.)
1.5 µL 10x buffer for Eco RI
1.5 µL 10x buffer for Hind III (It is probable that these two buffers are interchangeable.)
17.0 µL lambda DNA (at 0.286 ug/µL, = 5 ug DNA)
5.0 µL endonuclease (10 units/µL = 50 units of enzyme A)
5.0 µL endonuclease  (10 units/µL = 50 units of enzyme A)
total volume: 30.0 µL

2. Incubate at least 30 minutes at 37C, an hour might be OK, perhaps needed for double digestion.

3. Halt the reaction by placing on ice, add 6 µL of 6x loading dye, mix with same pipet, reset volume to 25 µL for next step (leave the tip in the Eppendorf tube used for digestion).

4. Load the wells: Pipet 5 µL into one well, reset pipet to 25 µL, pipet that volume into second well. On the same gel, run a lane with 1 ug undigested lambda DNA, and one with 5 ug of a Hind III digest as a standard.

Run the gel, photograph or carefully diagram the resulting bands.

Here are results of a 2006 experiment to test for optimum quantities of enzyme and optimum quantities of DNA.

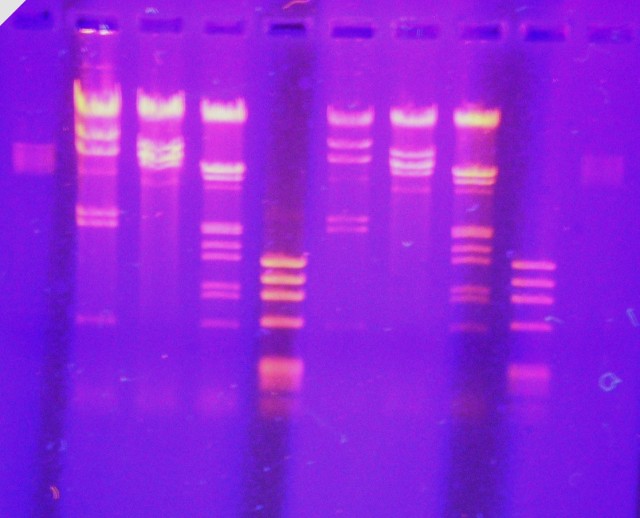
Below is the gel which we produced Winter Quarter 2005.  Problems?  Of course…  lanes 3 and 12 (BamHI) should be identical.  12 appears to have been contaminated with another endonuclease.  Lane 4 shows some double digestion, but may not have been digested long enough.  Lane 7 and 13 (EcoRI) should be identical.  Lane 7 did not have sufficient endonuclease activity.   But, endonuclese activity was demonstrated, and evidence of double digestion developed  on all lanes with double enzymes (lanes 4, 9, and 14).

digest_8feb05
electrophoresis of double digestion, 2005

Click here to see a similar experiement from 2009.

Below are less successful results from 2003. Some browsers resize the image, so be certain that you are referring to the correct lane. Clearly there were several problems. We used two different batches of endonucleases which may explain why digestion was observed in some cases but not in others. The second from the top may be smeared because the last of the enzyme was rinsed out of the tube in order to get the last bit for the digestion.

2003 endonucleases results

There are eight Hind III fragments: 23,130; 9416; 6557; 4361; 2322; 2027; 564;125 bp long.
The 564 band is in the bromphenol blue, and the 125 band appears beyond the dye band.

There are five Eco RI fragments: 21,226; 7421; 5804; 5643; 4878; 5330

The following fragments were reported on the web as the double digestion products:
Double: 21,226; 5148; 4973;4268; 3530; 2027; 1904; 1584; 1375; 947; 831; 564

prep of reagents for electrophoresis
comb
eppendorf tube
DNA electrophoresis
Gel diagram
50x TAE buffer:

For 100 mL of 50x buffer:

24.2 g TRIS (base)
5.71 mL glacial acetic acid
10 mL 0.5 M EDTA (14.6 g/100 ml)

Electrophoretic Separation of DNA Fragments

Electrophoretic Separation of DNA Fragments

NOTE: Latex gloves should be worn at all times to protect from ethidium bromide, and to prevent contamination of DNA samples with skin-borne endonucleases.

Also, prepare a practice gel with many small wells for students to practice loading 15 uL of water with loading dye into them. It makes for much cleaner loading of DNA samples when the “real” gel is run. At the bottom of the page are images of gels taken over the years, good, bad and indifferent…
EQUIPMENT
Ultra-clean glassware:
1 L beaker
1 L graduated cylinder
250 mL beakers
100 mL graduated cylinder horizontal electrophoresis unit
gel tray
power supply
well comb
micropipettors
UV transilluminator
SUPPLIES
latex gloves
TAE buffer (made fr 50x TAE*)
DNA grade agarose
10 mg/mL ethidium bromide
(CAUTION: carcinogen)
masking tape
DNA samples:
undigested lambda DNA
digested lambda DNA (eg: Hind III)
6x loading dye
microcentrifuge tubes

PREPARE THE RUNNING BUFFER AND GEL

1. Prepare running buffer: Dilute 20 mL 50x TAE buffer to 1 liter in dH2O, mix.

2. Prepare the agar : In 250 mL beaker, weight 0.64 g of DNA grade agarose. Add 80 mL 1x TAE buffer, heat to 95 C over flame with stirring (or in microwave 1 min, swirl, microwave for 15 more seconds). Swirl to ensure complete solution.

05_cool_agar_P3020016

3. Let cool to 50C.

4. Meanwhile, prepare the tray: tape the ends of the gel tray with masking tape. Press the tape firmly to ensure a good seal on all surfaces.

06_add_EthBr_P3020017md

5. CAUTION, wear gloves: When cooled to 50 C, a dd 4 µL of 10 mg/L ethidium bromide solution to 80 mL agar to make it 0.5 µg/mL.
Click to see the structure of ethidium bromide:

07pour_agar_into_tray_P3020019

6. Pour agar slab: Place taped tray on a level surface, pour in cooled agar

08_insert_comb_P3020021
Placing the comb in the tray containing the still melted agar

7. Place the comb at one end.

8. Let sit on level surface until completely solidified

10_removing_comb_P3020024

Gently 9. Remove the comb by wiggling and pulling straight up . Do not tear the agar.

10. Remove the tape from the ends.

APPARATUS SET UP, LOADING DNA SAMPLES, RUNNING THE SAMPLES

12_add_running_buffer_P3020026md

Set up electrophoresis apparatus: Lie the gel tray with agar in the level electrophoresis apparatus with the wells to the right, towards the black terminals (negative). Fill the apparatus with enough 1x TAE buffer to just cover the gel (filling the wells in the process).

Prepare the DNA samples so that they have 1 to 4 µg of DNA in up to 36 µL of solution containing 1x loading dye (i.e.: 5 µL sample plus 1 µL loading dye, or up to 30 µL sample plus 6 µL loading dye.) Mix either by flicking or by drawing up and down in the micropipet. Load 1 µg of undigested, 4 µg of digested DNA.

loading the wells Load the samples into the wells by loading the pipet with the desired volume of sample: with braced hands, insert the tip into the mouth of the well without touching the sides or bottom, slowly and steadily depress the plunger without shaking or causing bubbles . When the sample is loaded, withdraw the pipet directly out of the well with a smooth movement. The well should have a layer of blue with no irregularities surrounding it. Place standards (undigested DNA or lambda Hind III digest) in the outer wells.

14_samples_loaded_P3020027md

Run the gel: After the wells are loaded

Close the lid, attach the electrodes from the power supply , and turn on the DC power . Set the voltage for 150 volts, and plan to run it for at least an hour , preferably 2 to get the dye 2/3rds across the gel.

HERE ARE GEL IMAGES OF VARIOUS PREDIGESTS TAKEN OVER THE YEARS:

labeled_gel_30Jan03md
Here is a gel run in 2003. We have experimented with various digital camera settings to enhance the resolution of weak bands. This was taken in the black and white mode, and lists the digests of lambda DNA:
Lambda_digests_27Jan04
2004 gel: undigested, Eco RI, Bst EII and Hind III
lambda_digests_05_P1250118lbd
2005 labeled gel:
lambda_digests_25Jan06_lbd
2006 labeled gel:
2008_predigests_P1290110
2008 electrophoresis
2010Jan26_gel_10-18.P1260034
2010 predigested electrophoresis:

For 100 mL 50x TAE buffer:
24.2 g TRIS (base)
5.71 mL glacial acetic acid
10.0 mL 0.5 M EDTA (14.6 g/100 ml)