Making Ginger Ale at Home

Fermentation has been used by mankind for thousands of years for raising bread, fermenting wine and brewing beer. The products of the fermentation of sugar by baker’s yeast Saccharomyces cerevisiae (a fungus) are ethyl alcohol and carbon dioxide. (Here is a page on the chemical reactions involved in glycolysis and fermentation.) Carbon dioxide causes bread to rise and gives effervescent drinks their bubbles. This action of yeast on sugar is used to ‘carbonate’ beverages, as in the addition of bubbles to champagne).

We will set up a fermentation in a closed system and capture the generated carbon dioxide to carbonate our home made ginger ale. You may of course adjust the quantities of sugar and/or extract to taste. Note that the lemon called for in step eight is optional. And if you want a spicier drink, you can increase the amount of grated ginger. As with any yeast fermentation, there is a small amount of alcohol generated in the beverage (about 0.4%).

Equipment

  • Clean 2 liter plastic soft drink bottle with cap (not glass: explosions are dangerous.)
  • funnel
  • Grater (preferably with fine “cutting” teeth
  • 1 cup measuring cup
  • 1/4 tsp and 1 Tbl measuring spoons

Ingredients

  • Cane (table) sugar [sucrose] (1 cup)
  • Freshly grated ginger root (1 1/2-2 tablespoons)
  • Juice of one lemon
  • Fresh granular baker’s yeast (1/4 teaspoon)
  • Cold fresh pure water

Directions

Once the bottle feels hard to a forceful squeeze, usually only 24-48 hours, place in the refrigerator. Before opening, refrigerate at least overnight to thoroughly chill. Crack the lid of the thoroughly chilled ginger ale just a little to release the pressure slowly. You do not want a ginger ale fountain!

Notes

Do not leave the finished ginger ale in a warm place any longer than the time it takes for the bottle to feel hard. Leaving it at room temperature longer than two days, especially in the summer when the temperature is high, can generate enough pressure to explode the bottle! (Speaking from experience here…) Once it is thoroughly chilled, there is little danger of explosion.

Filter the ginger ale through a strainer if you find floating pieces of ginger objectionable. These are found in the first glass or two poured, and, since most of the ginger sinks to the bottom, the last glass or so may require filtering too. Rinse the bottle out immediately after serving the last of the batch.

There will be a sediment of grated ginger and yeast at the bottom of the bottle, so that the last bit of ginger ale will be carry ginger fibers. Decant carefully if you wish to avoid this sediment.

The gas will develop faster in ginger ale than in home made root beer, presumably because there are more nutrients in it than in root beer extract.

Related

About alcohol made in home made Ginger Ale or Root Beer

Glycolysis/Fermentation with Molecular Models

Glycolysis/Fermentation with Molecular Models

“Glycolysis” strikes fear into many undergrad biology students because it presents them with an abstract series of reactions and molecules which are difficult to visualize and therefore incorporate into a coherant biochemical framework. This exercise has each student taking responsibility for a single molecule in the series, learning the following about it:

1) its structure
2) its precursor
3) the enzyme which created it
4) the enzyme which will act on it
5) the product of that action
6) the significance of the bond structure, particularly those involving phosphate. (Note whether phosphoester (low energy) or phosphoanhydride (high energy).)

They are then to describe these features to their fellow students in sequence. This strategy for teaching glycolysis has received many positive reviews from students who have used it.

See the bottom of the page for a key to the elements and directions for the construction of the models.

Here is the sequential listing of the molecules of glycolysis

01_glucose_P9280144

1) Glucose

Glucose is both an aldose and a hexose. It enters the cell by diffusion, and the action of hexokinase holds it there.

Hexokinase transfers a phosphate from ATP to the number six carbon on glucose. This not only initiates glycolysis, but traps glucose in the cell since the ionic phosphate group makes diffusion out of the cell impossible without assistance.

02_glucose-6-phosphate_P9280145

2) Glucose-6-phosphate (G-6-P)

Phosphoglucoisomerase moves the carbonyl from the number one to the number two carbon, changing the molecule from an aldose to a ketose. This will free up the number one carbon for the phosphoryllation of the next step.

03_fructose-6-phosphate_P9280146

3) Fructose-6-phosphate (F-6-P)

Phosphofructokinase-1 is a critical enzyme in several ways. It transfers a phosphate from ATP to the number one carbon, thus placing ionic “handles” on either end (a PO4 on both the number 1 and number 6 carbons), allowing for the “breaking” of the molecule in the next step. This enzyme is allosterically inhibited by elevated ATP concentration.

04_fructose-1-6-bis_phosphate_P9280147

4) Fructose-1,6-bisphosphate (F1,6bisP)

Aldolase splits fructose-1,6-bisphosphate into two pieces, dihydroxyacetonephosphate (DHAP, a ketone) and glyceraldehyde-3-phosphate of the next step.

05_action_of_aldolase_P928014806_DHAP_and_glyceraldehyde-3-phosphate_P9280150

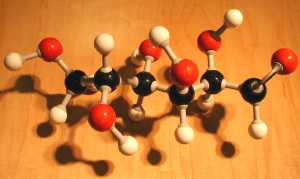
5) Dihydroxyacetone phosphate (DHAP)

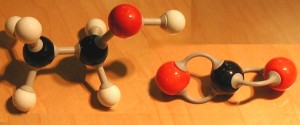
The image at the upper left shows fructose 1,6-phosphate at the bottom, splitting into dihydroxyacetone phosphate above on the left, and glyceraldehye-3-phosphate above on the right.

Triose phosphate isomerase moves the carbonyl from the number two carbon to the number one carbon, isomerizing DHAP to glyceraldehyde-3-phosphate. Thus, a single glucose generates two glyceraldehude-3-phosphates and all the following reactions are doubled.

The lower image shows dihydroxyacetone phosphate above on the left, and glyceraldehye-3-phosphate close up.

07_glyceraldhyde-3-phosphate_P9280152

6) Glyceraldehyde-3-phosphate (3-GAP)

Glyceraldehyde-3-phosphate dehydrogenase performs a complex reaction in which glyceraldehyde-3-phosphate is oxidized by the removal of the hydrogen from the aldehyde. This hydrogen is used to reduce NAD+. A phosphate is added to the number one carbon in place of the hydrogen. This produces a very high energy phosphoacid anhydride.

08_1-3_bis_phosphoglycerate_P9280153

7) 1,3-bisphosphoglycerate (1,3bisPGA)

Phosphoglycerokinase transfers the high energy phosphate from the phosphoanhydride bond on the number one carbon to an ADP (substrate level phosphoryllation).

Note that this is the first ATP to be generated, and two are created for every glucose molecule which entered the pathway.

09_3-phosphoglycerate_P9280154

8) 3-phosphoglycerate (3-PGA)

Phosphoglyceromutase moves the phosphate from the number three carbon to the number two carbon to prepare it for dehydration in the step after next.

10_2-phosphoglycerate_P9280155

9) 2-phosphoglycerate (2-PGA)

Enolase dehydrates 2-phosphoglycerate to form phosphoenolpyruvate.

thmb_11_phosphoenolpyrvate_P9280156

10) Phosphoenolpyruvate (PEP)

Pyruvate kinase transfers the high energy phosphate from PEP to ADP, yielding pyruvate and ATP.

Phosphoenolpyruvate is the most energetic molecule in all of the molecules in glucose catabolism, because of the strain in the enol and the phosphate being adjacent to an ethylene bond.

It can engage in substrate level phosphoryllation, donating its phosphate to an ADP yielding ATP.

12_pyruvic_acid_P9280157

11) Pyruvate

Pyruvate is the end product of glycolysis, and, in the presense of oxygen, will be dehydrogenated by pyruvate dehydrogenase to yield acetyl coenzyme A, the “crossroads” molecule of carbon metabolism.

12_lactate_PB121155

12) Lactic acid

Lactate dehydrogenase regenerates NAD+ (required for oxidation of glyceraldehyde-3-phosphate by (named for the opposite reaction) reducing pyruvate. This happens in muscle during intense exercise (ergo, muscle burn) and in milk during fermentation (butermilk and yogurt).

13_acetaldehyde_PB121156

13) Acetaldehyde

Pyruvate decarboxylase decarboxylates pyruvate in yeast to produce acetaldehyde. Thiamine is required for decarboxylation, and yeast synthesizes it in large quantities, making nutritional yeast an excellent source for this vitamin.

14_ethanol_CO2_PB121158

14) Carbon dioxide & Ethanol

Alcohol dehydrogenase oxidizes acetaldehyde and concomitantly oxidizes NADH to yield ethyl alcohol and NAD+, required for oxidation of glyceraldehude-3-phosphate thus allowing glycolysis to continue in the absense of oxygen or other hydrogen acceptor.

Once students have constructed the assigned molecule, and learned the enzymes and related molecules, the models are laid out in sequence on a big table, and students in succession gave the following information:

1) The name of the molecule they had constructed
2) Its characteristic features
3) How it differs from the previous molecule
5) The enzyme which produced it
6) How it will be changed into the next molecule and why
7) The name of the enzyme which performs this change and the meaning of the name of the enzyme.

Students were to discuss selected phosphorylated molecules (i.e. glucose 6 phosphate, 1,3 bisphosphoglycerate, and phosphoenolpyruvate), naming and discussing the bonds by which phosphate is attached, and the relative energy content in each type (phosphoester, phosphoanhydride, resons for PEP’s unusual energy). The products of hydrolysis of these bonds was demonstrated and discussed.

Following the discussion, students leave the room, the molecules are randomized, and students return and identify the molecules as a way of demonstrating what they have learned.

KEY TO CONSTRUCTION OF MODEL MOLECULES:

Here is the key for the identities of the elements in the models

For the construction, remember that in straight chain illustrations of the chemical structures:
The carbon back bone is vertical with vertical bonds from each carbon projecting away from the observer.

The horizontal bonds project towards the observer.

Review the lab protocol on the Krebs cycle molecules.

Videos on glycolysis from Films for the Humanities and Sciences series which review the process are:

VIDT QH 633 .C45 1992 pt.1 Cell and Energy (Series Title-Cellular Respiration)
VIDT QH 633 .C45 1992 pt.2 Glycolosis 1 (Series Title-Cellular Respiration)
VIDT QH 633 .C45 1992 pt.3 Glycolosis 2 (Series Title-Cellular Respiration

Handling Fresh Raw Milk

…or Controlling the Funkiness of your Cheese

The most important consideration in good flavored milk and milk products is the proper handling of the milk from the time it is milked out to the time that it is consumed or made into cheese. It makes me wonder about commercially available goat’s milk, which in my experience has a strong “goaty” flavor. The goat’s milk I produce only has had such flavor problems if the steps given below were not followed. Many people who say they hate the taste of goat’s milk are usually referring to ‘store-bought’ goat’s milk, and find mine mild, sweet and rich. Likewise, many commercial goat cheeses taste like they were cured in the billy pen… NOT to my liking.

Here are the critical factors I have discovered over a couple of decades of keeping goats and making cheese. All of these are aimed at keeping bacterial contamination as low as possible. Undesirable bacteria are what make milk products have an off flavor. The goal in cheese-making is to add beneficial bacteria which produces good flavor while avoiding the rest. Undesirable bacteria abound on goat hair and dander. Removal of these is the goal of careful filtration.
Never try to make cheese out of “turned” or spoiled milk–the unpleasant flavor will linger. Feed it to your pets if they will drink it. Otherwise, put it on the compost pile.

Note that repeated reference is made to complete drying of thoroughly cleansed equipment. The reason is that most bacteria do not survive well on clean dry surfaces exposed to the air.

Avoiding Bacterial Contamination in your Milk Products

Cleanliness/Sterility of Milking Cans and Storage Bottles:

  1. Immediately after milking, rinse equipment in lukewarm water to remove the majority of milk.  If you let the equipment sit, the drying milk will glue itself in the cracks and crevices, and will be come a breeding ground for bacteria.
  2. You should carefully wash the rinsed milking cans in very hot soapy water, rinse well, and air dry COMPLETELY. (Do not dry with a towel, it is easy to introduce bacteria this way.) If you have no problems with odor or taste in your milk, actually sterilization of the cans may not be required.  But if you are having problems, your implements should be boiled and air dried.  I avoid chlorine because of its poisonousness, but in the worst cases, may have to be resorted to.

Essentials of Recommended Cleansing:

  1. Wash implements well in very hot water and soap
  2. Rinse thoroughly in very hot fresh water
  3. Ensure that they are thoroughly air dried before using

If you must use chlorine for sterilization, use as little as possible, and avoid any trace in your milk.

Stages of Milk Handling


I.  Setting up Milking Equipment

II. Setting up Goat to be Milked

III. Cleansing Udders

IV. Milking and Feeding

V. Filtering and Recording

VI. Chilling

VII. Cleansing Equipment after Milking

Keep the milk chilled at 4ºC until ready for use.  Do not add warm milk to previously chilled milk.  It will encourage any bacteria in the older milk to grow.  However, once thoroughly chilled, milk from sequential milkings can be pooled.

Follow these steps and maintaining a temperature of no more than 4ºC in your refrigerator and your milk should keep easily for more than a week without pasteurization. If goat’s milk is kept this long, cream can be skimmed off when making cheese. Freeze this cream immediately after skimming to produce delicious ice cream.

If you don’t follow these steps closely, you risk a number of bacterial contaminations including those of Salmonella, Escherichia coli and reportedly, Listeria.

Milk Fermenters

Milk is extremely perishable and many means have been developed to preserve it. The earliest one which has been used for many thousands of years is fermentation. Milk can be fermented by inoculating fresh milk with the appropriate bacteria and keeping it at a temperature which favors bacterial growth. As the bacteria grow, they convert milk sugar (lactose) to lactic acid. You can detect its presence by the tart or sour taste (sour is how we taste acid). The lowered pH caused by lactic acid preserves the milk by preventing the growth of putrefactive and/or pathogenic bacteria which do not grow well in acid conditions.

FERMENTATION

Fermentation is a means by which cells growing anaerobically can still generate a little ATP. Fermentation is defined biochemically as the catabolism of glucose (or other sugars) in which the terminal hydrogen acceptor is an organic molecule (carbon containing). During the breakdown of sugar, known as glycolysis, excess hydrogen atoms are generated and must be deposited somewhere. In lactic acid bacteria, they “dump” excess hydrogens on to pyruvic acid, the end product of glucose. This turns pyruvic acid into lactic acid.

Our muscles do the same thing, which causes the sting in over exercised muscles. In all fermentation, NADH gives up its hydrogen to produce NAD, which is required for further glycolysis. Yeast too performs fermentation, but with different terminal hydrogen acceptors (acetaldehyde) and products (CO2 and ethanol). You will note that alcoholic fermentation is also an anaerobic process. Since the terminal hydrogen acceptor in each of these microbiological processes is an organic molecule, they are, by definition, fermentation.

In contrast, respiration uses an inorganic terminal hydrogen acceptor (such as oxygen). If oxygen is the acceptor, then water is produced.

Casein, the predominant protein in milk, is soluble at a neutral pH, but insoluble in acid. Thus when milk sours, casein precipitates which thickens the product. Numerous strains of bacteria are capable of converting lactose to lactic acid. We will look at several fermented milk products to study their morphology and staining characteristics.

  1. Make a thin smear of each milk product well spaced on the same slide, labeling with a wax pencil Y, B and S. (see protocol Smear and Staining of Bacterial Specimens)
  2. Stain them according to the procedure for the Gram stain (see related protocol Gram Stain Protocol), or any simple stain such as methylene blue, should you only be interested in seeing bacterial morphology.
  3. View the stained smear at 400x to determine the characteristic features, select a field which is well spread and typically stained. Then switch to 1000x with oil. (The oil immersion lens is challenging to novices. Do not use this lens unless you have been instructed in its use.)
  4. Illustrate typical fields for each milk product showing all observed morphologies of bacteria. Label the morphologies and their probable identities according to the following type of bacteria expected in these fermented milk products:

YOGURT

Yogurt is produced by a mixed culture of two types of bacteria. Imbedded in particles of the protein casein, you will see chains of cocci or diplococci (Streptococcus thermophilus) and big rod-shaped bacilli (either Lactobacillus acidophilus or L. bulgaricus). If you do a Gram stain, the bacteria will be Gram positive (purple) and the protein will be pink. The illustrations at the top of the page are micrographs I took of a Gram stain of yogurt. The purple rods are Lactobacillus, the purple spheres are Streptococcus. The pink globs are casein, milk protein.
BUTTERMILK

Buttermilk is the fermentation of milk by a culture lactic acid-producing Streptococcus lactis plus Leuconostoc citrovorum which converts lactic acid to aldehydes and ketones which gives it its flavor and aroma.

SOUR CREAM

Sour cream is produced by the same bacteria as buttermilk, but the starting milk product is pasteurized light cream. Bacteria are less numerous than in buttermilk.